Summary:
For my final project, I decided to explore Wearable technologies. I have been interested in 3D body scanning for a while now, so I decided to play with geometry and polygons. I always wanted to create a dress that moves according to body movements. My interactive system is a performance dress controlled by a dancer. When the wearer will move, the dress will transform and take another shape, like 3D geometrical muscles.
How the system was build?
• Body suit with 3 sensors. One bend sensor on the right side, 1 bend sensor at middle front and 1 pressure sensor behind the right knee.
• Hand made bend sensors: made with neoprene, conductive thread, and conductive fabric.
• I choose to use thin wires instead of thread because we experience that it can break easily, more solid.
• I use a small pocket to hide any Arduino Lilypad and batteries. In the future, I would use the Lilypad powered device so I can sew both on.
• I made the suit sleeveless so it could be worn underneath clothing. (Dress, suit).
• The actual dress was made of numerous geometrical shapes.
• I used metal strips to create an internal skeleton and choose carefully where to attach fishing thread so it’s pulled to shape specific or more controlled forms.
• Inside the dress, I attached (on the hanger) a foam board with servos. There are 3 different areas on the dress where polygons will be shaped according to the servos pulling and pushing the dress.
• I choose Skin color materials to emphasis the idea of extension of the body. I decided to hang the dress to represent a separate entity to really show….like virtual body extensions.
Programming
• I am using a Lilypad Arduino to run the circuit. The three sensors values are sent to Arduino and the data are sent to the servos. (two 360 and one 180)
The codes
Lilypad
int analogPin1 = 0;
int analogPin2 = 1;
int analogPin3 = 2;
int analogValue1 = 0;
int analogValue2 = 0;
int analogValue3 = 0;
void setup()
{
Serial.begin(9600); // opens serial port, sets data rate to 9600 bps
pinMode (13,OUTPUT);
pinMode (analogPin1, INPUT);
pinMode (analogPin2, INPUT);
pinMode (analogPin3, INPUT);
}
void loop()
{
digitalWrite(13,HIGH);
int analogValue1 = analogRead(analogPin1);
int analogValue2 = analogRead(analogPin2);
int analogValue3 = analogRead(analogPin3);
analogValue1 = constrain(analogValue1, 600 ,850);
analogValue2 = constrain(analogValue2, 650, 850);
analogValue3 = constrain(analogValue3, 0, 400);
analogValue1 = map(analogValue1, 600, 850, 0, 254);
analogValue2 = map(analogValue2, 650, 850, 0, 254);
analogValue3 = map(analogValue3, 0, 400, 0, 254);
/*Serial.print(255, BYTE);
Serial.print(analogValue1, BYTE);
Serial.print(analogValue2, BYTE);
Serial.print(analogValue3, BYTE);*/
Serial.print(analogValue1, DEC);
Serial.print(",");
Serial.print(analogValue2, DEC);
Serial.print(",");
Serial.println(analogValue3, DEC);
digitalWrite(13,LOW);
delay(1000); // wait for 5 mili seconds
}
Arduino
int servoPin = 10; // Control pin for servo motor
int minPulse = 500; // Minimum servo position
int maxPulse = 2500; // Maximum servo position
int pulse = 0; // Amount to pulse the servo
int incomingByte = 0; // for incoming serial data
long lastPulse = 0; // the time in milliseconds of the last pulse
int refreshTime = 20; // the time needed in between pulses
int analogValue = 0; // the value returned from the analog sensor
int analogPin = 0; // the analog pin that the sensor's on
void setup() {
pinMode(servoPin, OUTPUT); // Set servo pin as an output pin
pulse = minPulse; // Set the motor position value to the minimum
Serial.begin(9600);
}
void loop() {
if (Serial.available()>0) {
// read the incoming byte:
incomingByte = Serial.read();
incomingByte = map(incomingByte,0,255,0,1023); // convert the analog value
//analogValue = analogRead(analogPin); // read the analog input
pulse = map(incomingByte,0,1023,minPulse,maxPulse); // convert the analog value
// to a range between minPulse
Serial.println(incomingByte); // and maxPulse.
// pulse the servo again if rhe refresh time (20 ms) have passed:
if (millis() - lastPulse >= refreshTime) {
digitalWrite(servoPin, HIGH); // Turn the motor on
delayMicroseconds(pulse); // Length of the pulse sets the motor position
digitalWrite(servoPin, LOW); // Turn the motor off
lastPulse = millis(); // save the time of the last pulse
}
}
}
Conclusion:
As you know, interactive design is not my main subject. So it has been a challenge and hard for me, especially the programming part.
I would like to continue making this work efficiently and stable; maybe make 2 others for a performance, with bigger polygons. My aim is to make a short film with someone wearing the dress. I would also like to film different people wearing the dress to get different data.
This adventure has been a great experience, where I learned the technically of physical interactive design and understanding electricity.
Saturday, December 19, 2009
Thursday, December 17, 2009
Tuesday, December 15, 2009


Thursday, December 10, 2009
Still working...
Finally, the dress will be suspended and move according the the sensors on the body suit.


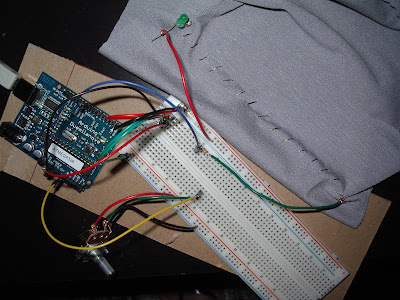
I made pockets to put the arduino and breadboard.


I made pockets to put the arduino and breadboard.

Tuesday, December 8, 2009


Monday, December 7, 2009
In the making of...
This dress is getting really time consuming....I have spent 36 hours on just making the outside dress. I am sewing little pieces of metal to form geometrical patterns. Here are some photos of what I have been working on.


Thursday, December 3, 2009
In process...


Ok, I think I figured out what I would like to do. I have been interested in D scanning for a while now, so I decided to play with geometry and polygons. The dress will be made of thick gray felt. There will be metal strips sewn into the creases in order to create an internal skeleton. I will strategically place loops at the end of metal strips to transform the shape when pulled. I will use 2 or 3 servos to modify the dress. One will be at the back of the neck, and the others at the back waist line. For sensors, I will use a stretch sensor between the legs, a bend sensor on one side of the body suit, and a weight sensor located close to toes on one foot. When the wearer will move, the dress will transform and take another shape, like 3D geometrical muscles. There will be 3 different areas on the dress where polygons will form and origami flowers will open. The three sensors will send information to processing and the data will come back to the servos. One servo will be integrated at the back neck of the dress and 2 others at back waist. I am using a Lilypad Arduino to run the circuit.
I am still planning to film the dress in movement.
Sunday, November 22, 2009
Final Project
Performance Play-dress
For my final project, I decided to explore Wearable technologies. With clothing we should express ourselves. I always wanted to create a dress that moves according to body movements. I was first inspired by the Art performances of Atsuko Tanaka and Yoko Ono, and the magic technicality of Hussein Chalayan dresses. I will play with textile transformation and movements. My aim is do make a short film with someone wearing the dress. I would like to film different people wearing the dress to get different data.
I will use stretch sensors, hand made bend sensors, and servos to pull and push different areas of the dress. I would also like to play with switches.
For now, I am at the stage to sketch different ideas for the dress and decide what and how many sensors I will need.
This project will be a great challenge. There are so much details to figure out in not so much time.
Here are some photos of my work in progress...


I found that old summer hat, that I think is really inspiring...

Tuesday, November 10, 2009
Media Controller: “Robotic hand”

We wanted to control and experiment with a physical activity. We made the arm/hand mechanism with 5 servos. The mechanism commands and imitates the function/ movement of the human forearm and hand. I made a glove filled with sensors, capable to capture the wearer’s movements (human hand) and translate the values in programming in order to direct and control the mechanism of the robotic hand.
I first started by building the simple Animatronics (robotic hand) with tubing, string, tapes, CD-cover Plastic, and a hot glue gun. By cutting away inside the joints, we could get a smooth movement on each finger. Cording is attached at the end of each fingers (thumb and index are attached together). The cords are attached to the servos that will control their flex movements. I made a forearm wearing a shirt, just to add the “real effect” to the robotic arm.
See: http://www.instructables.com/id/Simple-Animatronics-robotic-hand/

For this project I really wanted to try different techniques and materials.
The glove includes one bright red LED for video, 4 hand made/sewn bend sensors for all fingers movements, and a stretch sensor for the wrist twisting movements. All circuits are traced with conductive thread attached to wires at wrist.
After talking to Rory, he directed me to the “How to get what you want” website: www.kobakant.at. I decided to test the Fabric Bend Sensor because I though that would be the most suitable type of sensor for our project. The fabric bend sensors give good results (sensitivity) for measuring the bend of human joints when attached to the body. It is sensitive enough to register even slight bend and has a large enough range to still get information when the limbs are fully bent. The neoprene is great for isolating the conductive thread stitches and keeps the sensor from wrinkling even when repeatedly being bend.
Materials and Tools
Materials: Neoprene, conductive thread, conductive fabric, velostat.
I also used a conductive ink pen to secure the attachments with wires.
Tools: Fabric scissors, fabric pen, stencil, sewing needle, iron, pliers.
The resistance range of this bend sensor depends a lot on the initial pressure. But this can vary, depending on how the sensor is sewn and how big the overlap of the adjacent conductive surfaces is. The sensor still detects a difference, right down to about as hard as you can press with your fingers. The range is non-linear and gets smaller as the resistance decreases. The problem is that whoever wears the glove will give different values, so you have to remap the values in programming every time.
We also made a pocket to hide the Arduino and breadboard with the rests of neoprene.
Good websites for Wearable materials:
http://www.fashioningtech.com/
http://www.imagesco.com/sensors/stretch-sensor.html
http://www.lessemf.com/paint.html?tp=CONTINUE+SHOPPING
http://www.kobakant.at/DIY/?p=20
We had a lot of fun and spent many hours on this project. It was really interesting for me, who knows only the basic of programming, to learn from Chris Langer a really complex system of programming with the Arduino and Processing. Here are couple videos.
“Objectified”: A documentary film by Gary Hustwit
Last week, just before the media controller was due, I watched “Objectified”. The film shows how design often starts from problems, not aesthetic. The Former president of Braun believes that there are too many unnecessary gadgets on the market. He firmly clarifies that good design should be honest and that we need to know what to do with an object by just looking at the form. The documentary continues by putting emphasis on the human and object relation. Industrial designer Karim Hashid explains how we are entering in a 3rd era of technology. Designer must design for change; create relationship with things, and focus on the natural human behavior. Environmental issues push designers to focus on sustainability. They need to re-design aspects of products put on the market, and be responsible/conscious about the afterwords.
Thursday, October 22, 2009
Tuesday, October 20, 2009
"SNIFF'
I missed the work of Video artist Karolina Sobecka in Brooklyn in sept. 09 but here is an interesting interactive public projection.
Sniff from karolina sobecka on Vimeo.
Conductive thread
I received this afternoon the conductive thread and conductive pen I ordered. Here is my first try simply with a potentiometer, a LED and conductive thread (hand sewn & machine). It worked!


Sunday, October 18, 2009
Interactive media installations seem to be frequently used in museum environments.
Observation of interactive technology in public, used by multiple people
Couple weeks ago I was at the MAD (Museum of Art and Design) and found myself enjoying the interactive screens on different floors. I was really impressed with this fresh way of using interactive displays to solve information design problems. Museums are getting better at drawing the audience in to find out more about there exhibits and this example puts interactive displays in the same space as the Apple i-phone interface.
When you enter, there are screens mapping every floor of the museum. What I enjoyed particularly is the touch screens in each room that give you a quick access to the highlights of the collection and even the entire catalog. Visitors can control the amount of information they are given and access much more details about the different objects. These easy-to-use screens facilitate and entertain the visitors, who have the impression to be part of the exhibition. The screens are pretty big and easy to use by touching with your hand or fingers. It allows you to navigate through different objects complementary to the exhibit. I observe that mainly the young adults and children are using the touch screens. But occasionally, the older museum fanatics were really curious to try the new devices. The program is really straight forward and easy to follow. The transactions between images and menu are quick, almost instantaneous. This new technology allows its users to interact with the objects. It also builds a new relationship between the visitors and the museum environment.

Directional totem in the museum's lobby, part of the program of dynamic media created by Lisa Strausfeld and team. Lisa Strausfeld Featured in Fast Company’s 2009 Masters of Design
Wednesday, October 7, 2009
“The Psychopathology of everyday things”
The author talks about the frustrations facing everyday designs. He illustrates a variety of examples of poorly designed products, making you wondering and analyzing objects around you. He believes: “When simple things need pictures, labels, or instructions, the design has failed.” The fundamental principles of Design for Understandability and Usability are providing a good conceptual model and making things visible. In the rest of his work, the author shares his observations critiquing daily used products.
The author continues by explaining the principle of “mapping” which is defined by “a technical term meaning the relationship between two things; between the controls and their movements and the results in the world.” Then, the principle of “feedback” is explained as the action of “sending back to the user information about what action has actually been done, what result has been accomplished.”
Before creating a perfect product it usually takes 5 or 6 attempts to get it right. The functionality needs to be tested and improve until entire satisfaction.
Stupid Pet Trick
“NO WAY”: Comical but yet a practical device.

This analog circuit is constructed using a Force resistor sensor and a LED. When the sensor is activated by the individual, the LED brightens up, lighting the little black box. We then discover the words: NO WAY. This device has been created to communicate a straight forward message. This would eliminate uncomfortable and potentially long lasting exchanges with undesirable people. In the context of a bar or other social venues, this device could prove to be very useful.
Preferably, I would have needed more LEDs or a much brighter one. This “Stupid Pet Trick” could potentially, with improvement, become a practical object.


LAb: servo/analog out

I couldn't make the circuit work. I'll have to try again, but here is the pic of what I did...
Reading review: “Design meets Disability”
The chapter starts with the history of mass-produced products by Charles and Ray Eames, manufactured by Herman Miller in the 1940s and 1950s. Charles Eames believed that “design depends largely on constraints”
Design for disability has traditionally been about attracting as little attention as possible. The approach has been less about projecting a positive image and more about covering it.
Fashion is concerned with creating and projecting an image. Its goal is to make the wearer look good and feel better. For examples, eyewear has become an important product in the fashion industry. Since centuries, glasses have been considered to cause social humiliation. Only in 1991, the design press declared that “eyewear has become stylish.” A recent research shows that “Today, 20% of some brands of glasses are purchased with clear non-prescription lenses.” In that case, “the term user becomes inappropriate. Wearer sets up a different relationship between the designer and the person being designed for.”
Hearing aid is another important disability device. “Apart from the singer “Morrissey”, few people have been known to wear a hearing aid for show when they do need one.” Today, people (users/wearer) are used to the cell phone earpieces, earplugs, sending a positive imagery for technology. Hopefully the hearing aids industry will gather designers and engineers to create new products that would improve the self-image of their “patients”.
Later in the chapter, the author discusses the glamorization of prosthetic by actress/model/athlete Aimee Mullins. Her wardrobe is made up not only of different clothes that make her feel a different way but also different legs made of carbon fiber, silicon and curved wood.


Reading review: The User Illusion: “The Bandwidth of consciousness.”
In this chapter, the author presents his theory about human consciousness which processes only in 40 bits/sec. How much information we can take per second? Only one millionth of what we see, smell or hear. The discard information is far more than information present. “To be aware of an experience means it has passed”.
Consciousness is far slower than you inner mental life. We can’t stop thinking and absorbing information. The discard information is then transferred in the body language. We can communicate without words just by our physical reactions.
Consciousness is far slower than you inner mental life. We can’t stop thinking and absorbing information. The discard information is then transferred in the body language. We can communicate without words just by our physical reactions.
Wednesday, September 23, 2009
Fantasy Device- The Real Thing
I choose to create a device that would change my work environment. As I do a lot a research and writing for my thesis, I found myself spending hours in front of my computer. I would have my walls, ceiling and floor made of LED screen to project a desired environment. On my device, I choose a country, a city, an environment, and temperature. I can preview the 360 degrees panorama on a little screen before applying it to the entire room. With this device, I don't have to move and travel, with my studio to get inspired. I can change my environment depending on my mood and my work.


Subscribe to:
Posts (Atom)